<>

tips & tricks

the PHOTOGRAPHY 101 WORKSHOP is here!

You've been asking for this for a while now, and I'm happy to announce that it's HERE! Introducing the PHOTOGRAPHY 101 WORKSHOP (aka "getting your camera to do what you WANT it to do")!

Whether it's a point-and-shoot or a DSLR, learn to get the MOST out the camera you have.

You'll learn basic creative and technical skills to help you take your camera off AUTO and get the photos you crave!

Perfect for: Moms, Business Owners, Bloggers, and Creative Types.

This 3-hour workshop will provide printed materials as well as hands-on learning, so be sure to bring your camera!

Date: March 14, 2015 Time: 10:00 am - 1:00 pm Location: Timree's Paint Studio (Newport Beach location)

Space is EXTREMELY LIMITED... click here to save your space!

I hope to see you soon... and I can't wait to PLAY!


Personal Branding is the New Professionalism

I've been chatting lately about the importance of having a great bio picture, and how it can really help get your message across. But today, it's about pulling it all together. Today's post is by Nicole Longstreath of The Wardrobe Code:

------------------------------

Business Headshots in Orange County by The Suitcase Studio

There's a saying that goes, "Don't judge a book by it's cover."

Oh, honey - that's so twentieth century.

Before you can establish a name for yourself as business person and service provider, you have to have good personal branding. And part of branding is telling your story in a visual way.

Not the story you think the world wants to hear, but your unique, compelling story.

So this is it, baby! A photo shoot is your chance to tell the world who you really are, to differentiate yourself from competitors, and to create an urgent, insatiable desire for your services.

Because, as most of us are aware, clients don't buy services - they buy YOU.

Clients don't buy a haircut, they buy attention and pampering.

Clients don't buy the result of months of dieting and training, they buy the accountability and motivation that comes with a personal trainer.

Clients don't buy legal services, they buy security and peace of mind.

So, for an upcoming photo shoot, you want to take a look at your current branding to see how you can create some consistency. Not in love with your current branding? No problem. Having an updated photo shoot is a great way to course-correct.

Business Headshots in Orange County by The Suitcase Studio

And, speaking of branding, we're not just talking type fonts and colors.

When you're planning a photo shoot, you need to consider 2 very important things:

1.) What is the overall theme or concept for my business?

For me, it's rebellion.

My target customers feel like they're on the outside looking in when it comes to fashion. They're dying to be themselves and not ruled by trends - but they do have a desire to be fashionable in their own way.

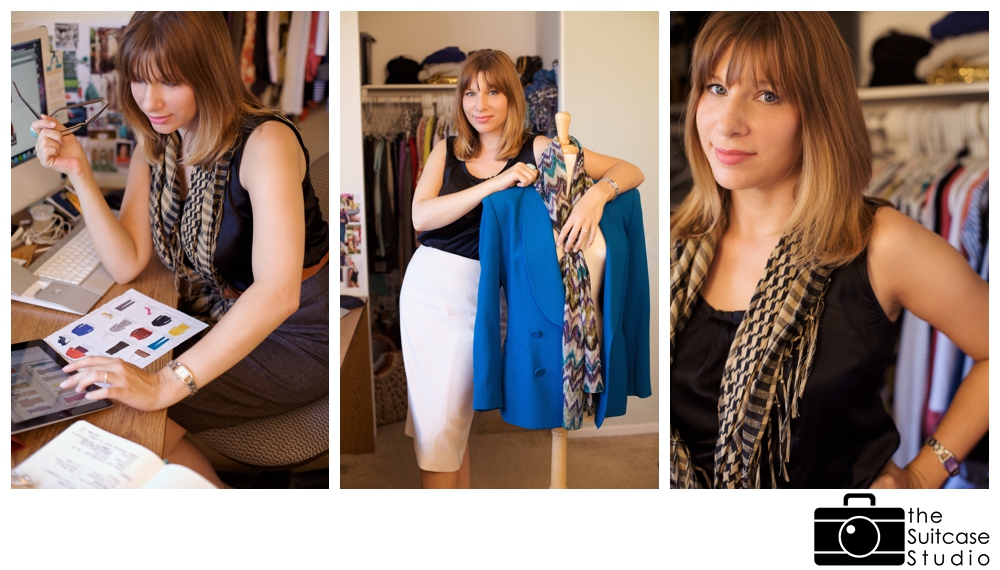
So, for my own upcoming photo shoot with Michelle, we're going with a theme of rebellion to communicate to my target clients, "I get you."

2.) How does that theme translate visually?

Remember when I said, "clients buy YOU"?

No pressure, but you're basically summing up your entire personality and business in either one or a brief series of photos. However, you can make the process easier by gathering some inspiration images to help guide you - and Michelle - toward the final result.

(Pinterest is a good tool for this, by the way.)

First you need to consider your surroundings - do you want studio or on location?

A studio shoot is going to feel more polished. Everything is more controlled - the lighting, the setting, wind/no wind - and it usually puts 100% of the focus on you.

But maybe that's not your brand. Maybe you want the scene to be part of your brand. Maybe your brand is more outdoorsy or artsy, and a specific, on location scene would actually help you tell your story.

Business Headshots in Orange County by The Suitcase Studio

Now that you've figured out where you'll be shooting, you must decide what you'll be wearing. Here's the deal: you can't phone this in with a plain white button-down and hope that your sparkling smile will be enough.

Long gone are the days when the ultimate goal was to look "professional." Yes, professionalism counts, but people want to know you get them.

To plan your look for your photo shoot, go back to your photo shoot concept (remember, mine is rebellion) and plan your outfit around that. It doesn't necessarily mean that you want to create a literal interpretation of your concept - like a costume - you simply want your outfit to be inspired by this concept.

I've been speaking a lot about

To help you put this together, imagine you're your target client: what do you want them to feel when they see your photo?

The answer: this person gets me. They understand my troubles and have a solution for me.

See, it really comes down to being your true self - just dial it up half a notch for your photos by adding some interest with color, pattern, accessories. Even a simple, but spectacular, dress will do the trick.

And this is where making the investment of quality photography comes in.

Anybody can put a camera in your face and create a pretty picture - but what you need, as a business owner, is someone keen to helping you tell your story in a visual way. A way that compels your target client to imagine working with you, and how transformative it would be for their life.

That's the thing about your clients - they just want to be understood. And they're looking to hire someone to help them feel understood.

----------------

Nicole Longstreath is on a mission to save women from the dysfunctional shopping experience. She is a wardrobe stylist working with women across the globe to build personal brands that command attention and influence. You can find her at her home base, http://theWardrobeCode.com

----------------

Ready to update your bio photo? Click on the image below to learn more and save your spot!

bizcasualminisession

artistic touches

When it comes to taking pictures and editing them, I hear a LOT of people say "Oh, I'll just get what I can and fix it in Photoshop." Confession time: that used to be me. But not anymore. When I take a picture, I have a finished image already in mind. I compose my shot the way I want it to be... cropping in-camera and making sure my angles are lined up properly. I also change my camera settings constantly, as the light & color changes from moment to moment, direction to direction, surrounding to surrounding.

Because of this, my editing has gotten a LOT faster. My shots are pretty close to finalized even straight out of the camera. But there are a few things I have in mind as I compose my image that I can't always get in the moment, and so I do still use Photoshop for my final touches. Sometimes I add a light color wash, and sometimes the scene calls for a bright pop of color instead. I use Photoshop to artistically enhance the photo, bringing it close to the what I saw in my head when I originally captured the image. Actions are layered to create the mood I want to evoke (though layers are never used full-force).

So the biggest editing tip I can offer that will save you LOTS of time, headache and heartache: Photoshop is best used for enhancement purposes instead of relied upon to "fix" your images.

A few samples as I played around with a few new actions I recently purchased (images were taken at the Sweetlight Collective Workshop attended in March):

Thoughts, comments, or questions? I'd love to hear your responses and get a conversation going.


DIY Packaging Station

This is the year of organization! And my first mini-project: an over-the-door wrapping/packaging station! I've wanted to do this for SOOOOO long, but just never took the time to tackle it. Till now. (Ta-Da!) (That's a lot of "t's", but let's move on, shall we?)

I have a teeny-tiny place, so not a lot of room to spread out as I'd like. But I didn't relish my old routine of breaking out a box of supplies and digging through them every time I had an order to prepare. Nuh-uh. So now, I'm streamlined. (I hear the angels singing as a golden ray of sun appears...)

I bought myself an ordinary over-the-door towel rack to use for this project. Then I simply draped my favorite tissue papers over the bars. (Note: must use smaller size tissue, as many types are too long to fit here without being trimmed first. I learned this the hard way with the striped-patterned tissue paper.)

On one hook at the bottom of the towel rack hangs my spool of baker's twine.

On the other hook hangs some gift bags. I use one gift bag to hold the rest of my smaller packaging supplies: thank you notes, pens, scissors, and logo stickers.

Now everything has its place. My boxes are kept flat inside my closet, and my smaller supplies have a place of their own within easy grasp.

Easy-peasy. And super-cute, too. TheSuitcaseStudio_0039.jpg

Supplies:

REMEMBER: Just a few short days left to take advantage of 2012 pricing! Pricing goes up as of January 31st. Contact me here to book your session now.

from "pretty" to "OOOOOH"

[Tips, tricks and behind the scenes a bit.] There are a lot of photographers out there known in the community as the "shoot and burn" type. They will take your picture, burn you a disc of the results, and that's that.

That's just not me.

I love love LOVE spending time behind the computer to customize my images. Each session has a different "look" and "feel" to it...a different recipe that brings out the mood of the moment. This is my art.  This is where I  play.

Very rarely will you see an un-edited image of mine. During a portrait session, I do show you a few images on the back of my camera just so you can see what we're capturing and know we're on the right track (and can be assured that you look FABULOUS), but very rarely do I share an un-edited image otherwise.

Here's why.

I LOVE the dreamy, creamy, sun-kissed look.The pop of color and brightness.

But being a natural light photographer, I can't control Mother Nature... which means I can't always control my light source (as I'd be able to if I were in a studio setting). Yes, I can use light modifiers such as scrims, reflectors and flash... but those don't always work with my spontaneous, natural shooting style (especially in sessions with wiggly wee ones). And while I've gotten to the point where I actually prefer to work in the sunlight (as opposed to open shade, which is the "beginner's" trick), it doesn't always cooperate.

So while the photos I take look DO look good straight out of the camera (SOOC), I like to give them that extra little "oomph" to get them to that place I visualized when I originally shot the image.

I do use Photoshop... not as a crutch to "fix" images... but as a tool to enhance them.

Below is a great example of this.

The image was taken in an open field in pretty harsh light. You can see that the sunlight is coming from the back/left side of the subject. Had this been shot in "automatic" mode with my camera, the sky would be a vivid blue, but the subject's face would be nearly black. Using manual settings I was able to manipulate the scene so that the subject's face (the most important part) was properly exposed. I also used the environment to help manipulate the light... the light colored sand the subject is walking on works as a natural reflector to bounce light back at her, while I angled the paper umbrella she holds to work as a scrim... diffusing the sunlight before hitting her face so there are no harsh shadows.

The image on the left is straight out of the camera (SOOC). Pretty darn good.

But I wanted to add that dreamy, creamy look that I love. So I brightened up her skin and eyes a bit, played with the contrast, and then layered on a few favorite Photoshop "actions" to achieve that warm glow. (A quick note to those of you who dabble with "actions"... here's the trick: do NOT use them in full force.)

And the image on my right is my final product.

OOOooooOOOOOOOOo0ooooohhhhh.

Comparison of Edited vs SOOC Image - The Suitcase Studio

Like what you see? Sign up for my newsletter by clicking the red tab on the left. I've got BIG things planned for next year and you won't want to miss out!

documenting the everyday

I document my life on a daily basis. It's just what I do. Long before Facebook told me it was cool to share what I ate for lunch, and Foursquare allowed me to "check in" with my location, and Instagram let me instantly share my view with others... I was still documenting. I was collecting, journaling, scrapbooking. And taking lots and lots of pictures of my everyday. Because in the long run, it's the everyday moments that count.

I still journal, and I still take daily pictures.

And I invite you to do the same.

Not sure what to document, exactly? Try starting with this:

20121130-121036.jpg

There are lots of different daily prompts out there to choose from, but the one from Chantelle Ellem on Instagram is one of the more popular ones to play along with. (You might recognize her as @fatmumslim.)

I'll be playing along with this one in December, too. Follow along with my own daily adventures here: http://instagram.com/thesuitcasestudio

I'd LOVE to see how your December goes. Be sure to tag me in posts on Instagram and Facebook (@thesuitcasestudio) so I don't miss a thing!

be my valentine?

Since I don't have any kids of my own, I borrow my nieces and nephews whenever I want to play with a new idea. They are more than willing (especially when they get to play with my dog while awaiting their turn in front of the camera). And I love getting the opportunity to capture them in imagery while they're still young. This year, I created Valentine's Day cards for the kiddos to hand out in class. They were super-excited about the idea... especially when they realized that it meant that they'd have EXTRA lollipops left over to share. (Kids will be kids.)

Here is this year's creation:

Love this idea, and want to do it yourself? Here's how:

1. Take a picture of your kid with their arm outstretched and their hand in a fist.

2. Have the pictures printed as WALLET-SIZED prints. (Note: the cards I created were printed as 4"x5" flat cards through Millers Imaging, but the wallet print works nicely, too, and is closer in size to the traditional classroom Valentine.)

3. Leave the photo as-is, or line the back with scrapbook paper (using a glue-stick) to make it extra-pretty.

4. With an exacto blade, cut slits on each photo at the top and bottom of the clenched fist.

5. Slide your choice of lollipop through the paper and "into the fist."

6. Ta-Da!

(Many, many thanks to my friend Paula of R&P Photography for this fabulous idea!)


Prepping for a fabulous photo session

Let's face it... unless you're a supermodel of sorts, it can be W-E-I-R-D to be in front of the camera. I get it. But being as prepared as possible can help take the edge off a bit. But let me clarify... by prepping, I do NOT mean staring at yourself in a mirror for hours on end and practicing all your favorite moves.  Instead, I suggest the following steps:

How to prep for a fabulous photo session

1. Let's get to know each other. I highly recommend meeting up ahead of time for an in-person consultation. It's the best way to meet face to face for the first time without the camera between us, and an easy way to get comfortable in each others' presence so that by the time the camera comes out, it's as if we've been friends forever. But I understand that time and/or distance might prevent us from getting together before the day of our session. That's why I also have a questionnaire for you to complete. Whether for a solo, couple or family session, my questionnaires are designed for me to get to know the real you pretty quickly.

2. Select your outfits (and try them on) ahead of time. We've all been there... you have a special event coming up and pick out the perfect outfit in your mind's eye. But what you don't realize until it's too late is that the shirt is in the hamper, the pants are a bit too snug, and you can't find your favorite pair of earrings. So there's a mad dash around your closet or, time permitting, a mad dash to the shopping mall. To prevent both scenarios, coordinate your complete outfit ahead of time (including undergarments and accessories) and try them all on together to make sure you look and feel fabulous.

3. Pick a few treasured items to bring along in order to customize your experience. You could bring big or little items to include, depending on what your style is, and how much we'll be wandering during our session. A few examples from past clients: Marc & Beth brought dogtags that had belonged to Marc... he had had given them to Beth for safekeeping while he was away, and they became a symbol in their relationship. And Jack and Georgina brought along several momentos... records they enjoy listening to, a wine bottle from their wedding, a framed picture from their first date, and a beloved book they read to their sons at bedtime. Please note... not all of these items necessarily need to be featured in the photos together, and sometimes not even at all. But often times, just having these items close-by will spark the memories, and enhance the connections.


4. If kids or pets are involved, bring along a few extra goodies. Let kids choose one of their toys to bring along with them. Sometimes, just having something familiar in their hands (or close-by) will help them to relax a bit more. And if the kiddos have a treasured toy that they just won't let out of their sight, why not showcase it in a few of the pictures to remember them at this moment in time? As for the furry friends, make sure to bring along a favorite squeak toy and a few treats to keep them interested along the way.

5. Plan for the location. If we're heading to the beach, you might want to bring a change of clothes (or at least a fresh pair of socks) in case the waves get too close. And don't forget the sweaters for after a sunset shoot. Once the sun sets, it gets chilly.

6. Give yourself a cushion of extra time. No matter how well you plan your time, sometimes things pop up to throw you off track. You can't find your car keys or purse, your phone rang as you were heading out the door, you hit traffic on the way and you can't find parking... it's enough to make a person scream! (Not the best way to start your portrait session.) Simply allow yourself a few extra minutes when you're planning your departure in order to give yourself some breathing room.

7. Provide a soundtrack. Music sets the mood. If we're in a place where we can crank the tunes, let's do it! I bring along some portable speakers and can pop in my iPhone and set up a Pandora station just for you. But if you have something special in mind that you'd like to hear, just bring it along and we'll use your tunes instead.

8. Expect the unexpected. Life isn't perfect. So let's not aim for perfection. Let's plan to PLAY, instead. Roll with the punches, and take life as it comes. It's so much more FUN that way, don'tcha think?